There are several ways to add a custom field (order / post meta) to your template:
- By using a Custom Block from the PDF Customizer.
- By using the address customization options of our Professional extension.
- By creating a custom template and inserting a code snippet.
- By using one of the template action hooks.
For all of these options, you need to know the field name (also called ‘meta key’). If you’re not sure what field name to use, read this first.
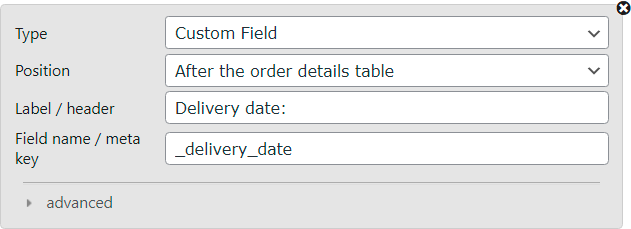
Using a custom block from the PDF Customizer #
This is the easiest way to display a custom field on your PDF documents, thanks to the Premium Templates extension of the WooCommerce PDF Invoices and Packing Slips Plus Bundle It only requires:
- Adding a custom block.
- Setting the custom block’s “Type” to “Custom Field“.
- Entering the custom field’s meta-key into the “Field name / meta key” textbox.
Using address customization settings (Professional extension) #
With the Professional extension, you can add custom fields to the billing or shipping address easily via the settings on the Pro tab. Simply put the field name (meta key) of your custom field between curly brackets, like this: {{custom_fieldname}}
For example, if you want to add the customer’s EU VAT Number below the billing address, you can enter:
{{billing_address}}
{{vat_number}}
Note: the specific field name of the VAT number can vary, depending on how this was stored in the order. The above example is based on how the official WooCommerce EU VAT Number stores it (WooCommerce EU VAT Compliance for example, stores the number as VAT Number, so you’d use {{VAT Number}} instead). If you don’t know the meta key of the VAT number for your site, check this guide: Finding WooCommerce Custom Fields
These address customization settings also allow for more advanced formatting of the address with HTML:
<h3>{{billing_company}}</h3>
<b>{{billing_first_name}} {{billing_last_name}}</b>
{{billing_address_1}}
{{billing_address_2}}
{{billing_city}}, {{billing_postcode}}, {{billing_state_code}}
Vat Number: {{vat_number}}
The possibilities are virtually endless, and it saves you from having to create a custom template for this purpose!
In a custom template #
If you want full control over how and where the custom field is printed in the PDF, you can create a custom template and then put the following code snippet in the location where you want to output the custom field:
<?php $this->custom_field('custom_fieldname'); ?>Where you replace custom_fieldname with the name of the field you want to display. Note that depending on how you added the custom field, you may need to add an underscore before the field name (i.e. _custom_fieldname).
You can also include the label within the snippet, this will make sure the label is not shown when there is no data for this custom field (or if the custom field is not present in the order):
<?php $this->custom_field('custom_fieldname', 'Custom field:'); ?>With a template action hook #
The template engine of PDF Invoices & Packing slips is built for flexibility, and includes several action hooks where you can output custom content.
For example, to print a custom field (like ‘delivery_date’) below the regular order data on the packing slip, you could insert the following code into your themes functions.php or the template-functions.php file inside your custom template folder:
add_action( 'wpo_wcpdf_after_order_data', 'wpo_wcpdf_delivery_date', 10, 2 );
function wpo_wcpdf_delivery_date ($template_type, $order) {
    if ($template_type == 'packing-slip') {
        $document = wcpdf_get_document( $template_type, $order );
        ?>
        <tr class="delivery-date">
            <th>Delivery Date:</th>
            <td><?php $document->custom_field('delivery_date'); ?></td>
        </tr>
        <?php
    }
}
or, if you prefer using the internal WooCommerce functions directly (without loading the invoice document):
add_action( 'wpo_wcpdf_after_order_data', 'wpo_wcpdf_delivery_date', 10, 2 );
function wpo_wcpdf_delivery_date ($template_type, $order) {
    if ($template_type == 'packing-slip') {
        ?>
        <tr class="delivery-date">
            <th>Delivery Date:</th>
            <td><?php echo $order->get_meta('delivery_date'); ?></td>
        </tr>
        <?php
    }
}
This particular example shows the custom field after the order data on the packing slip, but there are several other locations you can add your custom field, and you don’t need to restrict this to the packing slip. You can read more about this in the PDF template action hooks documentation.


