Table of Contents
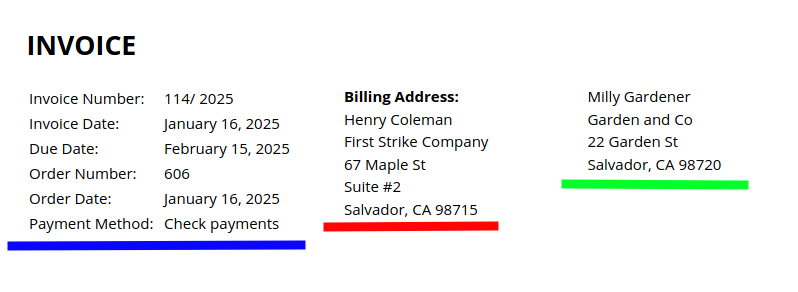
Default view #
The default view of the address fields and order data on the Simple or Simple-Premium template is as shown in the screenshot below.
From left to right, the default order of appearance is:
- Billing address (in red),
- Shipping address (in green),
- Order data (in blue).
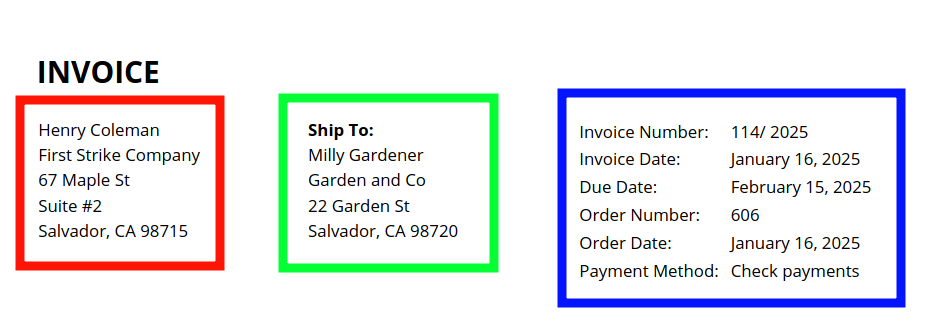
Option 1: Flip the billing and shipping addresses #
Reading the results from left to right:
- Shipping address,
- Billing address,
- Order data.

Code snippet:
<?php
/**
 * Swap billing address for shipping address (and vice versa)
 */
add_action( 'wpo_wcpdf_before_html', 'wpo_wcpdf_swap_billing_shipping', 10, 2 );
function wpo_wcpdf_swap_billing_shipping( $document_type, $document ) {
    if ($document_type == 'invoice') {
        add_filter( 'wpo_wcpdf_shipping_address', function( $shipping_address, $invoice ) {
            return $invoice->order->get_formatted_billing_address();
        }, 10, 2 );
        add_filter( 'wpo_wcpdf_billing_address', function( $billing_address, $invoice ) {
            return $invoice->order->get_formatted_shipping_address();
        }, 10, 2 );
        add_filter( 'gettext', function( $translation, $text, $domain ) {
            if ( $text == 'Ship To:' && $domain == 'woocommerce-pdf-invoices-packing-slips' ) {
                $translation = __( 'Billing Address:', 'woocommerce-pdf-invoices-packing-slips' );
            }
            return $translation;
        }, 10, 3 );
    }
}
If you have not used code snippets before, read this article.
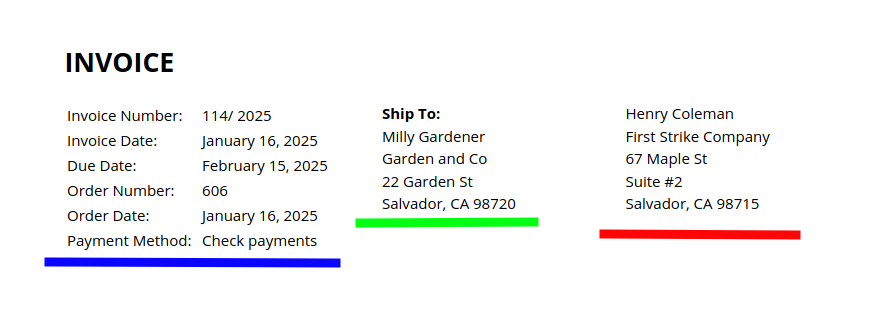
Option 2: Flip the order of the addresses and order data #
This method flip the whole row; resulting in a visual flip of the positions of the billing address and the order data. The shipping address will still appear in the middle.
Reading the results from left to right:
- Order data,
- Shipping address,
- Billing address.
The CSS styling code:
.order-data-addresses,
.order-data-addresses > tr,
.order-data-addresses > tr > td,
.order-data-addresses > tbody,
.order-data-addresses > tbody > tr,
.order-data-addresses > tbody > tr > td {
    display: block;
}

.order-data-addresses {
    padding-bottom: 8mm;
}

.order-data-addresses td.order-data {
    width: 40%;
}
.order-data-addresses td.shipping-address {
    float: right;
    width: 30%;
}
.order-data-addresses td.billing-address {
    float: right;
    width: 30%;
}- If you have access to the PDF Customizer, paste this code at WooCommerce > PDF Invoices > Customizer > Custom Styles.

- If you do not own the PDF Customizer, paste the code at Appearance > Customize > Additional CSS.
- Some themes provide a specific way to add custom CSS to your site.
Option 3: Combine options 1 and 2 #
This simply requires following the instructions from options 1 and 2 above and will produce its own result.
Reading the results from left to right:
- Order data,
- Billing address,
- Shipping address.