- Network connection setup
- Sending documents to the Peppol Network
- You are ready to go
The E-Documents Network plugin allows your WooCommerce store to connect directly to the Peppol Network and send compliant electronic documents (e-documents) such as invoices using Peppol BIS 3.0.
Network connection setup #
Follow these steps to establish the Network connection:
1. Purchase a Network subscription #
Start by purchasing an active eDocuments for WooCommerce: Peppol.
2. Install the Network plugin #
Once payment is confirmed:
- You will receive access to download the Network plugin
- A license key will also be provided
Install the plugin in your WooCommerce store.
3. Activate the license key #
Activate the license key in the plugin settings.
This step is required before the Network connection can be authorized.
4. Authorize the Network connection #
Go to: E-Documents → Settings → Network
Click Authorize to start the authentication process.

5. KYC validation (pending status) #
If authorization succeeds:
- You will see a message indicating that KYC validation is pending
- Our team will review and validate the submitted information
During this phase, the Network connection status will remain Pending.
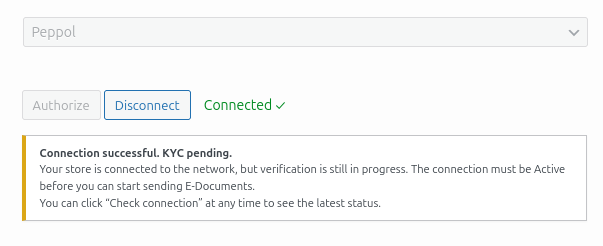
You can return to the Network tab at any time and click Check Connection to refresh the connection status. Once validation is approved, the status will change to Active.
6. Network connection becomes active #
Once KYC validation is approved:
- The Network connection status changes to Active
- Your store is now fully connected to the Peppol Network
At this point, you are ready to start sending e-documents.

Sending documents to the Peppol Network #
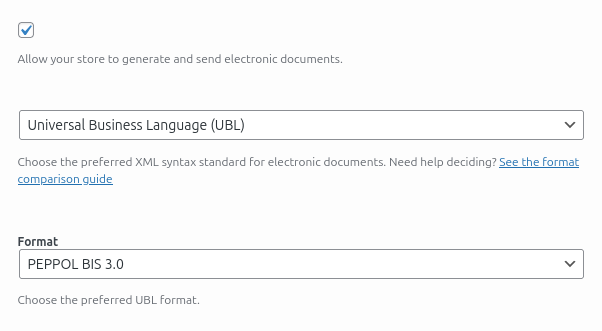
1. Configure E-Document settings #
Go to E-Documents → Settings and ensure that:
- The selected format is Peppol BIS 3.0
- All required seller and company details are completed
2. Peppol Endpoint ID (Participant) #
The Peppol Endpoint ID is filled automatically from the active Network connection.
Other Peppol-related fields must be completed manually.
3. Network-specific settings #
The Network plugin adds the following options:
- Auto-send to Network
- Send to B2B only
- Send to customers in selected countries
- Network error alerts
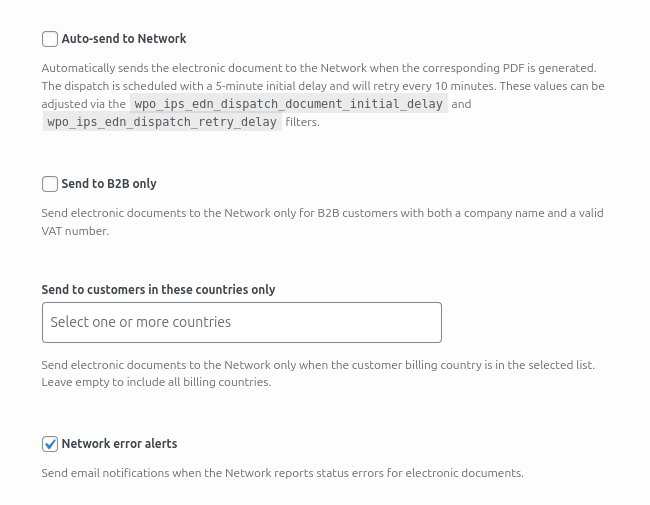
Recommended approach when starting:
- Keep Auto-send disabled initially
- First send at least one document manually and confirm it succeeds
- Enable the remaining options as needed, and strongly consider enabling Network error alerts.
4. Tax classification #
Ensure all taxes are correctly classified according to Peppol requirements.
Follow the tax classification guide provided in our documentation.
Incorrect tax mapping is one of the most common reasons for network rejections.
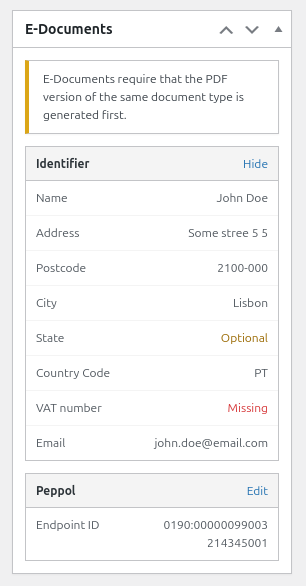
5. Required customer data #
For a document to be accepted by the Network, the customer must provide:
- A valid VAT number
- A valid Peppol Endpoint ID
5.1 VAT number handling #
We automatically attempt to retrieve the VAT number from several known order meta keys from Popular WooCommerce VAT plugins:
vat_number_vat_number_billing_vat_number_eu_vat_evidence_billing_eu_vat_numberyweu_billing_vatbilling_vat_billing_vat_id_shipping_vat_id_billing_dic_billing_eu_vat
If you do not use a compatible VAT plugin, we also provide our own VAT plugin.
5.2 Peppol Endpoint ID at checkout #
The Peppol Endpoint ID field must be enabled under E-Document Settings to be shown during checkout.
6. Verify order data #
After an order is placed:
- Check the E-Documents meta box in the order sidebar
- Confirm that all required customer information is present and valid
7. Generate the XML invoice #
Once:
- The order data is valid
- The PDF invoice has been generated
The XML invoice becomes available and can be sent to the Network.
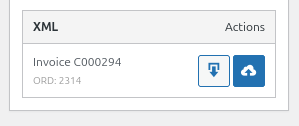
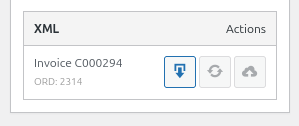
8. Manual sending #
If auto-send is disabled:
- A Send to Network button will be available
- After sending, the Network will respond with a document status (usually within a few minutes)
If the document fails:
- Fix any XML or data issues
- Resubmit the document
If the Network is temporarily unavailable:
- The document will be sent automatically once connectivity is restored. If the document was already sent, status checks will also resume automatically.
- You can also request a manual status update if the option becomes available
9. Automatic sending #
When auto-send is enabled, the e-document is sent automatically as soon as the PDF invoice is generated.
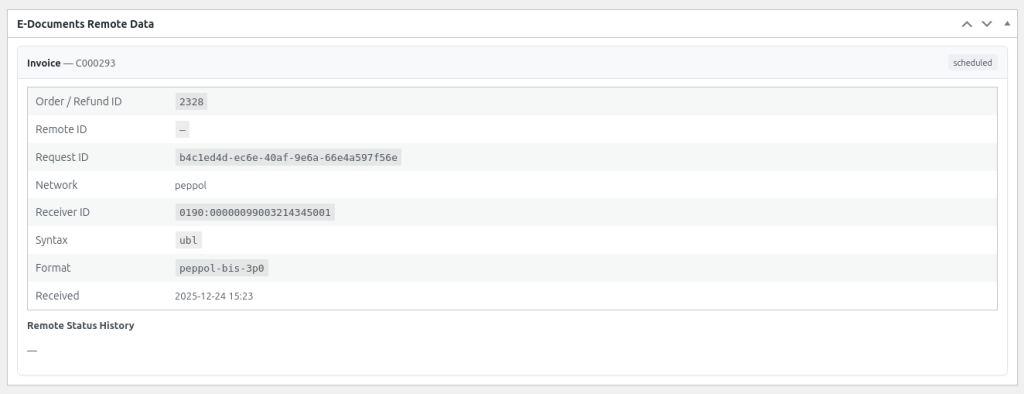
10. Document status #
At the bottom of the order page, a meta box displays the most recent document status returned by the Network. This is useful for tracking delivery progress and troubleshooting any errors reported during validation or delivery.
11. Network error alerts #
If Network error alerts are enabled, you will receive email notifications whenever a document receives an error response from the Network
This is strongly recommended for early detection and troubleshooting.
You are ready to go #
Once the Network connection is Active and your settings are correctly configured, your store can reliably send Peppol-compliant e-documents directly from WooCommerce.
If you encounter validation issues or Network errors, start by reviewing:
- Customer VAT and Endpoint ID data
- Tax classification
- XML validation feedback from the Network
If you are unable to resolve the issue, please contact our support team and we will be happy to assist you.


