If you create a custom block in the Customizer of your Premium Templates plugin it is possible to show all sorts of data in your documents. You can add data in two ways:
- Set the type of your custom block to text and add placeholders enclosed with double accolades.
- Set the type of your custom block to custom field and the meta key of your own custom field.
The first is the most flexible. Letting you add your own text and all kinds of order data. The second one lets you add the data of a specific custom field, with the added advantage that you can hide this part in your document if it turns out to be empty. Be aware that this second option takes specific meta keys. If you are having trouble finding the meta key you would like to use please read the following: Finding WooCommerce custom fields
How to use order data in a custom block? #
If you want to use data out of your order in one of your documents you can create a custom block. Go to your WordPress Dashboard > WooCommerce > PDF Invoices > Customizer and create a custom block in the Custom Block section. The most flexible way to show order data is to set the type of your custom block to text.
Choose the position where you want to show your custom output on the document. Give it the desired label. And in the text field enter one or multiple placeholders, which all should be enclosed with double accolades like this: {{placeholder}}. You can also add your own custom text here.

What order data can I use? #
If you added a custom block with the type set to text you can use the following placeholders (including accolades):
- {{invoice_number}} – the invoice number
- {{invoice_date}} – the invoice date
- {{document_number}} the document number
- {{document_date}} – the document date
- {{order_status}} – the order status
- {{status}} – the order status slug
- {{version}} – the WooCommerce version
- {{currency}} – the order currency
- {{site_title}} – the site title
- {{wpo_wcpdf_shop_name}} – the shop name set under WooCommerce > PDF Invoices
- {{shipping_notes}} – the shipping / customer notes (entered by the customer in the checkout)
- {{order_notes}} – the order notes
- {{invoice_notes}} – the invoice notes
- {{private_order_notes}} – the private order notes
- {{order_number}} – the order number
- {{date_created}} – the date the order was created
- {{date_modified}} – the date the order was modified
- {{order_date}} – the order date
- {{order_time}} – the order time
- {{transaction_id}} – the transaction ID
- {{order_weight}} – the total weight of all items in the order
- {{order_qty}} – the total quantity of items in the order
- {{date_completed}} – the date when the order was completed
- {{current_date}} – the current date (when the PDF is printed/downloaded from the site)
- {{used_coupons}} – the coupons used in this order
- {{current_user_name}} – the username of the current user
- {{customer_id}} – the customer ID
- {{customer_ip_address}} – the customer IP address
- {{customer_order_count}} – the customer order count
- {{customer_total_spent}} – the customer total spent
- {{customer_registered_date}} – the customer registered date
- {{customer_user_agent}} – the customer user agent
- {{formatted_order_total}} – the order total
- {{formatted_subtotal}} – the subtotal
- {{formatted_discount}} – the given discount
- {{formatted_shipping}} – the shipping costs
- {{formatted_order_total_ex}} – the total without taxes
- {{formatted_subtotal_ex}} – the subtotal without taxes
- {{formatted_discount_ex}} – the given discount without taxes
- {{formatted_shipping_ex}} – the shipping costs without taxes
- {{spelled_out_total}} – the spelled out total
- {{shipping_method}} – the shipping method name
- {{payment_method_title}} – the payment method name
- {{payment_method_description}} – the payment method description
- {{payment_method_instructions}} – the payment method instructions (when applicable)
- {{payment_method_thankyou_page_text}} – the payment method “Thank you” page text
- {{payment_status}} – the order payment status (“Paid” or “Unpaid”)
- {{payment_url}} – the checkout payment URL
- {{date_paid}} – the date of payment
- {{time_paid}} – the time the order was paid
- {{wpo_wcpdf_shop_address}} – the shop address set under WooCommerce > PDF Invoices > General
- {{wpo_wcpdf_footer}} – the footer set under WooCommerce > PDF Invoices > General
- {{wpo_wcpdf_extra_1}} – the extra field 1 set under WooCommerce > PDF Invoices > General
- {{wpo_wcpdf_extra_2}} – the extra field 2 set under WooCommerce > PDF Invoices > General
- {{wpo_wcpdf_extra_3}} – the extra field 3 set under WooCommerce > PDF Invoices > General
- {{ABSPATH}} – the absolute path to the WordPress directory
- {{WP_CONTENT_DIR}} – the WordPress content directory path
- {{document_barcode}} – shows the document barcode from WooCommerce Ultimate Barcodes
- {{order_barcode}} – shows the order barcode from WooCommerce Ultimate Barcodes
- {{wc_order_barcode}} – Shows the barcode from WooCommerce Order Barcodes
- {{local_pickup_plus_pickup_details}} – Shows information from WooCommerce Local Pickup Plus
- {{myparcel_track_trace}} – Shows the order track & trace from WooCommerce MyParcel
- {{myparcel_track_trace_link}} – Shows the order track & trace link from WooCommerce MyParcel
- {{myparcel_delivery_options}} – Shows the order delivery options from WooCommerce MyParcel
Billing address
- {{billing_address}} – the full billing address, formatted by WooCommerce
- {{billing_first_name}} – the first name of the billing address
- {{billing_last_name}} – the last name of the billing address
- {{billing_company}} – the company name of the billing address
- {{billing_address_1}} – the first address line of the billing address
- {{billing_address_2}} – the second address line of the billing address
- {{billing_city}} – the city name of the billing address
- {{billing_postcode}} – the ZIP code of the billing address
- {{billing_country}} – name of the country of the billing address
- {{billing_state}} – the name of the state of the billing address
- {{billing_email}} – the email address of the billing address
- {{billing_phone}} – the phone number of the billing address
Shipping address
- {{shipping_address}} – the full shipping address, formatted by WooCommerce
- {{shipping_first_name}} – the first name of the shipping address
- {{shipping_last_name}} – the last name of the shipping address
- {{shipping_company}} – the company name of the shipping address
- {{shipping_address_1}} – the first address line of the shipping address
- {{shipping_address_2}} – the second address line of the shipping address
- {{shipping_city}} – the name of the city of the shipping address
- {{shipping_postcode}} – the ZIP code of the shipping address
- {{shipping_country}} – the name of the country of the shipping address
- {{shipping_state}} – the name of the state of the shipping address
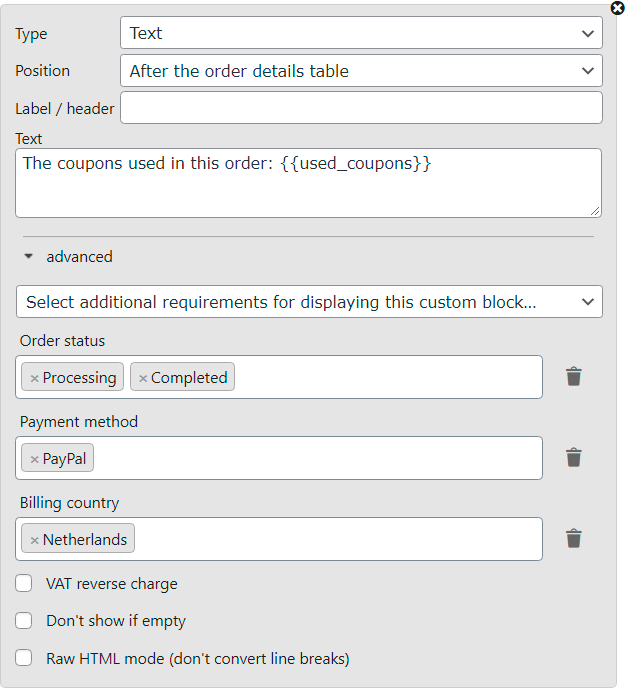
Apply conditional logic to your custom block #
When expanding your custom block by clicking on ‘advanced’ you will see additional options that will let you apply conditional logic. Here you can select requirements for displaying your custom block:
- Order status: Only shows the custom block if the order status matches (one of) the selected order status(es).
- Payment Method: Only shows the custom block if the payment method of the order matches (one of) the selected payment method(s).
- VAT reverse charge: Only shows the custom block when the order is VAT exempt and a valid VAT number is registered during checkout.
- Don’t show if empty: Will not display your custom block when the text field of your block turns out to be empty. Please note that when you are using a
{{placeholder}}accompanied by additional text the custom block will display. As the text field will not be empty even though the placeholder does not return a value.
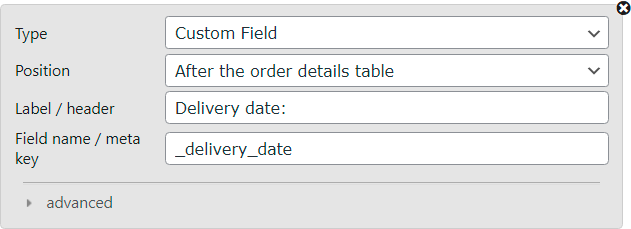
Can I add the data of my own custom field? #
Sure. If you have created a custom field, you can easily add it to one of your documents. Go to your WordPress Dashboard > WooCommerce > PDF Invoices > Customizer and create a custom block in the Custom Block section.
Set the type to Custom field. Choose the position where you want to show your custom output on the document. Give it the desired label. And in the Field name / Meta key field, enter your meta key. The meta key is the same as the name you have given your custom field. You can also choose to hide this field when it turns out to be empty.